Showing posts with label Bridge Building Series. Show all posts

Monday, May 23, 2016

Bridge Building Series - Truss Bridge 2

Truss Bridge 2 – Straws & tape (A challenge project)

This project needs more accurate taping, which might be a tad difficult for primary students. However, I've done this project with a group of 3rd graders, and they were able to build sufficient truss bridges.

Supplies:
·         A bag/box of straws
·         Tape
·         Scissors
·         Small cups
·         Paper clips
·         Weights – pennies, paper clips, etc. Anything is OK as long as they weigh the same. You want to compare how much different bridge designs can support
    
Instructions:
1.      Cut a bundle of straws to same size (~2 1/2 inches long). Leave some for different lengths. These will be cut to size.
2.      Tape four pieces together to make a square. Tape uniformly across all places. Create enough square to span an opening that is 10 inches wide.


Created bottom of the truss bridge first, then continued to build the sides of the bridge. (These squares measure to 11 inches in length.)


3.      After creating several squares, put cross bracings diagonally (cut these to size).


4.      Put the top pieces last and enclose the truss bridge.
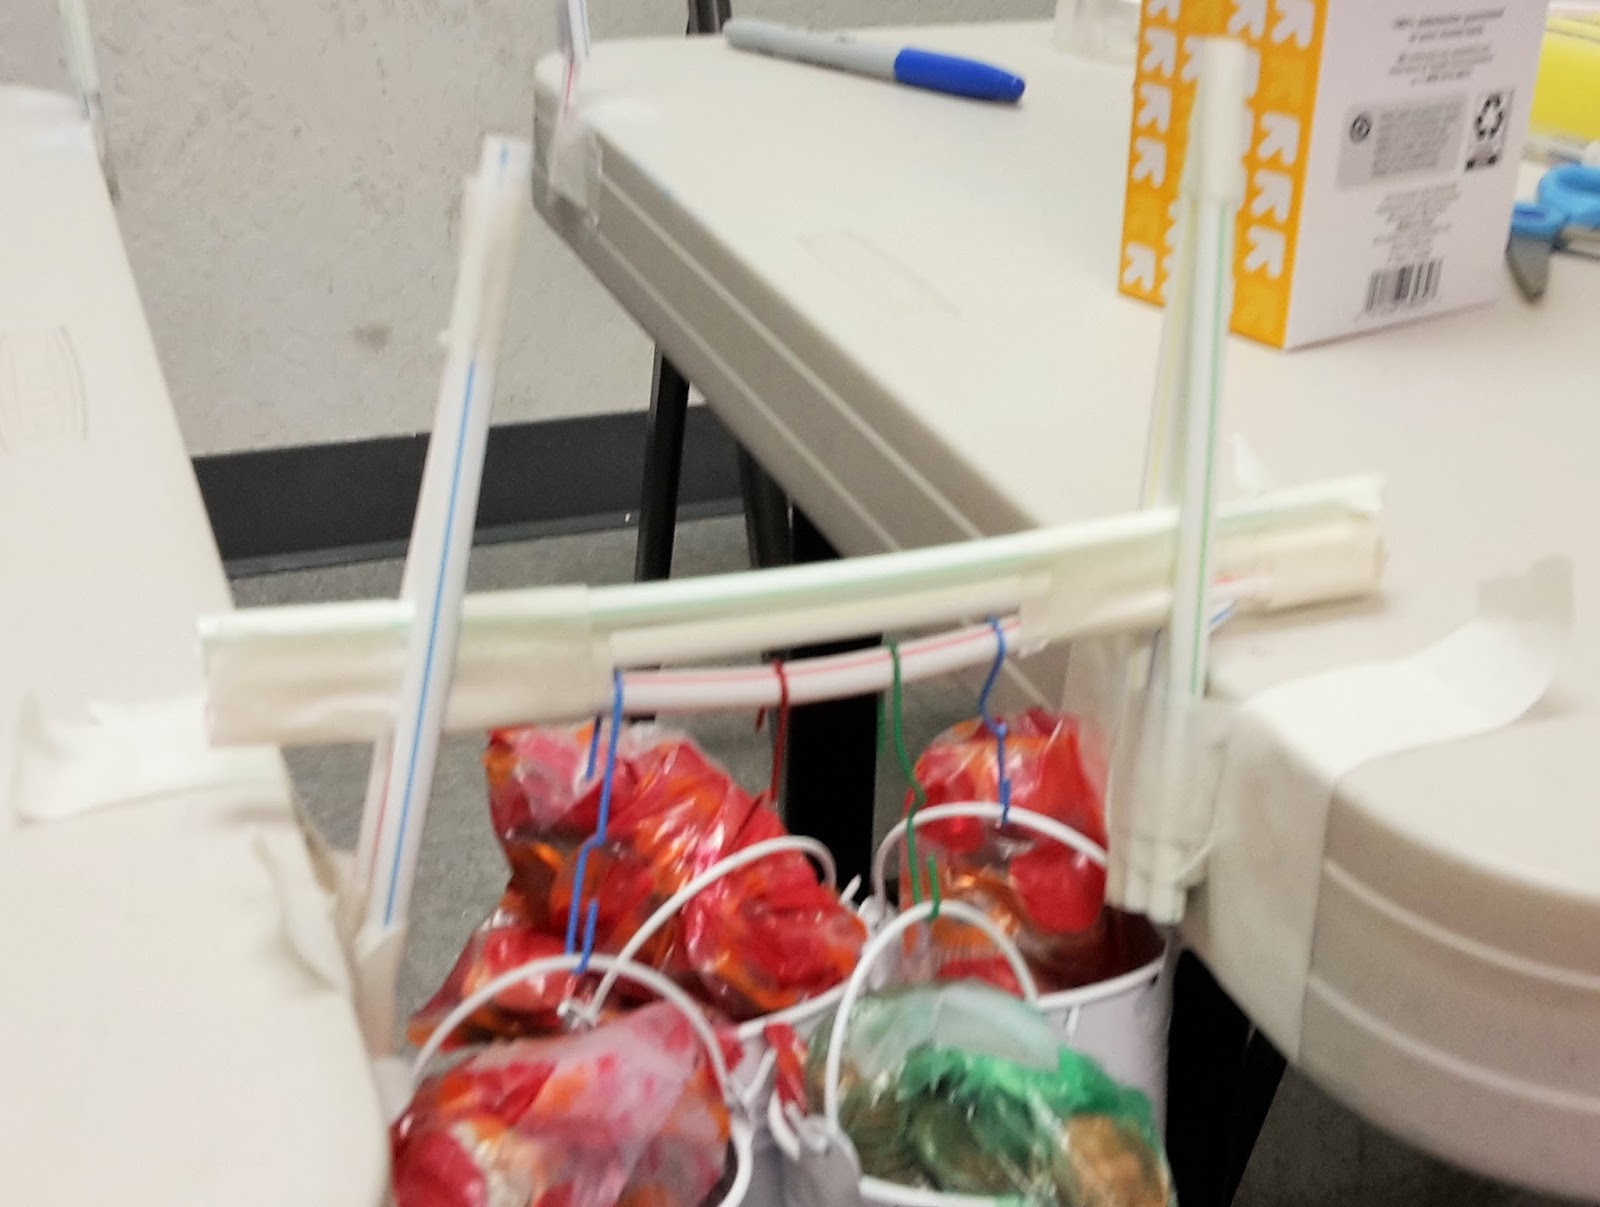
5.      Place the truss bridge between two desks, tables, chairs, etc.


6.      Hang a small cup in the middle of the bridge (use hole puncher and paper clips) and load it with pennies, paper clips, etc. to weigh it down and test its strength.
Same amount as beam bridge

Added more coins
Added another bucket full of coins.
7.      Different size straws, too much tape on one side vs. the other side, etc. will create imbalance and weaknesses in the bridge structure. Try to balance taping, straw usage, etc. on all sides.


This straw and tape truss bridge was much stronger than I expected. I think I could have added another bucket of coins, but I ran out of bridge space. Maybe you can build a longer bridge and test how many buckets of coins your bridge will hold. Of course, the longer the bridge span, weaker the bridge. So, you might have to consider the bridge span vs. support strength of the abutment.

Remember, Engineering is all about failing and trying, again. So, try and try, again.

Wednesday, May 18, 2016

Bridge Building Series - Truss Bridge 1

Truss bridge building instructions 1

We’ll make different truss bridges using two different materials - foam cubes and cut drinking straw pieces.

Design Rules for both bridges:

1.      Bridge must span 10 inches (25 cm)
2.      Bridge must have a place to attach a small cup in the center of the span (preferred).
3.      The ends of the bridge are not taped onto the support structure.

Bridge 1 – Marshmallow/foam cubes/cheese balls & toothpicks

NOTE: The best material for this project is foam cubes. However, a container of foam cubes can get very expensive (I've paid $27.49 for a container of 105 foam cubes), so if you can find more affordable ones, please let me know.

I've done this project with marshmallows, and it's doable (for intermediate grades). And cheese balls get messy, but doable as well.

Supplies:
·         A bag of marshmallows, foam cubes, or cheese balls
·         A box of toothpicks
·         Tape
·         Small cups
·         Paper clips
·         Weights – pennies, paper clips, etc. Anything is OK as long as they weigh the same. You want to compare how much different bridge designs can support
    
Instructions:
1.   Create a square with four foam cube pieces and toothpicks. Create 3 more. Put them together to create a cube. 


2.   Create several more cubes and put them together until you reach 10 inches in length. Remember, your bridge must be longer than the span it needs to bridge (add an inch or two to the total length of your bridge).
  

3.   Place the bridge between two desks, tables, chairs, etc.
4.   Hang a small cup in the middle of the bridge (use hole puncher and paper clips) and load it with pennies, paper clips, etc. to weigh it down and test its strength.

~same number of coins in the cup as the beam bridge project

added another cup of coins

added more coins to each cup

Again, this project works best with these foam cubes. I purchased from Amazon, but they are pricey. I did find some smaller foam cubes from the Dollar Tree store, and they worked well. But it's very difficult to find them consistently. You can see them on their online store, and the store managers don't seem to know when or if they'll ever get another shipment. So, if you find another source of reasonably priced foam cubes, please let me know.

Tuesday, May 17, 2016

Bridge Building Series - Truss Bridge Introduction

Truss Bridges

A truss bridge is a bridge that bears its weight through its truss system. This truss system is composed of triangles that give its strength.
 
Truss bridges are one of the oldest types of modern bridges and are more economical to build than solid beams with additional support structures on the bottom.

Most commonly used truss bridge designs are Pratt, Warren, and Howe, but engineers have used many different truss patterns in bridges.

        
Cantilever bridges are beam bridges that are supported on only one end. These type of bridges often use a pair of spans that extend from opposite sides of the supporting structures to and meet in the middle. This bridge feature allows ships and other superstructures to pass.

Truss bridges can be made with all kinds of materials. The most impressive ones I've seen so far are the bridges made with popsicle sticks and glue; however, I try to minimize the mess in classrooms, so my truss bridges are made with foam cubes and straws.

Have a great day. 


Tuesday, May 10, 2016

Bridge Building Series - Arch Bridge

Arch Bridges

Arch bridges have extraordinary strength due to their shape.


Unlike a beam bridge, the weight and the load on an arch bridge are pushed outward and carried along the curve to the support structures at each end called abutments.

An arch bridge carries all loads in compression, without any tensile forces. The stones in an arch bridge stay together by the force of their weight and the compressive force transferred between them. 

The size of the arch directly affects the effectiveness of an arch bridge. The arch is flattened down in very large arch bridges and large tensile forces that must be factored into the bridge design.


A simple arch bridge experiment

Supplies:
·         A ¼ piece of cardstock paper
·         A permanent marker
·         A ruler
·         A stack of books to wedge in the paper

Building instructions:
1.   Draw lines 1/2” apart on the cardboard or cardstock paper. 
2.   Wedge it between a gap created by books, chairs, desks, or other objects.
3.   Tape the ends onto the books, desks, or other objects.
4.   Now, press down on any part of the arched cardboard or cardstock paper. What happened? What is happening with the lines on the cardboard?

Top View

An arch bridge without an additional load.

An arch bridge with some load. It still holds its shape well.

An arch bridge with considerable load. It still holds its shape pretty well.

An arch bridge in danger of collapsing. The arch has flattened out too much.

Bottom View
An arch bridge with very little load. It holds its shape well.

An arch bridge with more load. It holds its shape well, again.

An arch bridge under considerable load. Its arch is beginning to flatten out a bit.

An arch bridge in danger of collapsing. The arch has flattened out too much.
Again, this is a very simple project, but it does an excellent job of demonstrating what an arch bridge experiences under load.


Wednesday, May 4, 2016

Bridge Building Series - Beam Bridge 2

Now that we understand the basics, let's go on to a more complicated beam bridge project.

We’ll make a beam bridge in this section using straws and tape.

Design Rules for the bridge:
1.      Bridge must span 12 inches.
2.      Bridge must have a place to attach a small cup in the center of the span (preferred).

Supplies:
·         A bag/box of straws
·         Tape
·         Scissors
·         Small cups (or wedding favor mini buckets from the Dollar Tree stores)
·         Paper clips
·         Weights – pennies, paper clips, etc. Anything is OK as long as they weigh the same. You want to compare how much different bridge designs can support
    
Instructions:
1.   Take 6 straws and cut off all the bendy parts, if you have bendy straws.
2.   On one end, pull a straw 1 1/2 inch up between two straws and tape them together.
3.   On the other end, tape together the two straws without anything in between them. This should result in a triangular shaped support structure for your beam bridge. 


5.   Repeat steps 3 and 4 and make the second support structure.
6.   Tape the wide ends of the support structure to tables, chairs, desks, etc. that are 12 inches apart.
7.   Place a straw between the support towers.


8.   Hang a small cup in the middle of the bridge (use hole puncher and paper clips) and load it with pennies, paper clips, etc. to weigh it down and test its strength.


I've done this project with my students, and I was blown away by how much a bridge like this could hold.

This bridge has 3 reinforced beams, but the beams themselves are neither taped to the table nor the support structure.

This is a variation on the beam bridge with side supports and 3 reinforced beams.

This bridges is made of 3 reinforced beams, but without any other special features.

My students' beam bridges held up to 500 pennies with their specially designed beam bridges.

Do you think you can beat that? I bet you can. I thought this type of bridge could hold up to ~200 pennies, at the most. Boy, was I wrong!

I hope you have a lot of fun with this project.


Monday, May 2, 2016

Bridge Building Series - Beam Bridge 1

Before we go on to the topic of beam bridges, I'd like to discuss the type of forces acting on a bridge. 

At any given time, two types of forces act on a bridge: compressive force (compression) and tensile force (tension).

The compressive force is a force that compresses or shortens the thing it is acting on. The tensile force is a force that expands or lengthens the section it is acting on.

Beam Bridges

These bridges are everywhere.

They are the simplest and least expensive bridges to build. 

When a load is placed on the beam bridge, the top of the beam bridge is pushed down by a compressive force as a tensile force stretches the lower portion of the beam bridge. The farther apart the supports structures are, the weaker a beam bridge becomes. 

A simple beam bridge experiment

Supplies:
·         A sponge 
·         A permanent marker
·         A ruler
·         2 books (or anything that can create a gap to lay a sponge across)

 Build instructions:
1.   Draw lines 1/2” apart on the sponge.
2.   Lay it across a gap created by books, desks, or other flat objects.
3.   Tape/secure the ends onto the books, desks, or other objects.
4.   Now, press down on any part of the sponge. What happened? Do the lines curve inward and closer or curve outward and farther on top of the bridge? How about the bottom of the bridge?

Top View


The 1/2" gap between the two lines is beginning to close in and shorten.

The 1/2" gap between the two lines is closing and is shortened noticeably compared to the gap between the other lines.

The 1/2" gap between the two lines is invisible. It looks as if the two lines are one.


Bottom View

The 1/2" gap between the two center lines is just beginning to lengthen.

The 1/2" gap between the two center lines is lengthening more.

The 1/2" gap between the two center lines has expanded and lengthened.

Our bridge has collapsed due to too much load on the bridge.

I never thought to do this simple experiment because it seemed so...simple. But it easily and clearly demonstrates tensile and compressive forces acting on a bridge. 

This simple understanding will lay the foundation for the bridge experiments to come.

Have a great day!