Saturday, October 24, 2015

Tech Challenge Update - 10/24/15

It's that time of the year, again. The start of another Tech Challenge at the Tech Museum of San Jose.


This year's challenge is... (from the website)
http://www.thetech.org/tech-challenge-presented-emc

The 2016 challenge: Build a glider to deliver supplies to a remote location!
This year, you tell the story! What is your glider carrying? Where are you going? Why?

New award for 2016: Top Tech Challenge story! 
Who: Students in Grades 4-12
What: A team engineering design challenge
When: Event Days are Saturday, April 23 (Grades 4-6) and Sunday, April 24 (Grades 9-12 and Grades 7-8)
Why: To develop creative solutions to a real-world problem

Please check out the challenge and join in on the fun.

I think this is one of the best STEM programs out there, and kids learn so much from the process. Not about STEM, but about very important life lessons such as perseverance, teamwork, problem-solving, leadership, and dealing with multiple, repeated failure.

Sure, it seems like a lot of time commitment, but our teams have spent between 36 - 57 hours (that's from October to April) and attended 3 - 5 test trials in the last three years.

But how much time you spend with your team depends on your team's schedule and availability. I've known teams that attend every test trial each year, and other teams that barely attend one. There is no correct formula to experience this wonderful learning process.

Have a great day.

Saturday, September 26, 2015

an update

Hello everyone,

I've been dealing with an urgent family medical issue that ended up becoming a long-term care event since mid-July, and I haven't had the time to pay attention to this blog. My plan is to get back to this blog sometime soon. 

In the meantime, I've created a t-shirt design to encourage kids to embrace Science. I see so many cute t-shirts about playing video games, not wanting to do homework, etc., but not much for encouraging Science or anything else remotely academic for that matter.

Please check out the link below.


Have a great weekend.


Monday, July 13, 2015

Air-powered vehicle, Part 2 - How to make a vehicle

Two years ago, I spent 26+ hours prepping a rubber band drag racer for a 4th grade class science project (my guinea pig class), and it was a complete BUST! Even after I worked out the kinks, unforeseen issues came up and things didn't go smoothly. After spending 1 1/2 hours in class, kids were very disappointed with the result (imagine my frustration!). 

After that project, I have a general rule of spending two to three hours to try it out, and if it doesn't work, I go on to another. Well, this one, I tried building a prototype with my daughter, and it went very well. I'm definitely going to use this project in the classroom this fall.


Prototype my daughter and I built the other day.
 As I said before, there are books/kits combo for this project on sale online, but it was cost-prohibitive for me. So, I came up with a more affordable alternative.

Supplies Needed:


  • Balloon
  • Rubber bands
  • Straws
  • Thin bamboo chopsticks (skewers, lollipop stick, etc. will work, too)
  • Ruler
  • Scotch tape
  • Masking tape
  • ~2" diameter circle maker
  • A piece of cardstock paper
  • Small screwdriver or awl
  • Something to cut chopsticks
  • Scissors
Project Instructions:
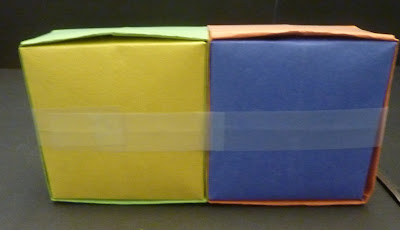
  • Step 1 - Tape together the two boxes from the Part 1 of this project and set them aside.


  • Step 2 - Trace and cut out the Six wheels with the holes for the axle in the center.


  • Step 3 - Mark and cut three axle casings to size (~1/2" wider than the vehicle body width). An axle should freely slide in the casing. 

  • Step 4 - Mark and cut three axles to size (~ 1" to 1 1/2" wider than the axle casing width). An axle should slide freely in the casing.


  • Step 5 - Assembling the "engine" of this vehicle.
  • Insert a straw into a balloon.
  • Put a rubber band around the neck of the balloon over the straw.
DO NOT tie the rubber band too tight. It can collapse the straw, and it won't work well (I've learned from experience). The bendy-side of the straw should be outside to direct the air flow.

  • Step 6 - Tape the axle casings on the bottom of the vehicle. Place rubber bands on the boxes. The orange box is the front-end of the vehicle, and the green box is the back-end of the vehicle. This rubber band configuration worked for me, but you can try others to keep the balloon and the straw in place.
  • Step 7 - Put the wheels on the axle. Surprisingly, this was the most difficult part of the project - sticking/taping/sliding wheels onto the axle. I wasn't satisfied with any of the processes of keeping the wheels on the axle, but all three ways work.
  • Step 8 - Affix balloon and straw on the top of the vehicle.
  • Step 9 - Blow the balloon and have a race!
Need a picture

In the process of building this vehicle for the blog and instructables.com, I built three.


I found it challenging to make the vehicle go straight. There were a lot of variables to consider, but the most important one is to make sure that the axle casing is taped on straight. Also, try tweaking the axle and flattening out or smoothing out wheels, but the results were mixed. I may have to tinker with this a little longer.

This project was a surprise because I expected it to take longer. But it didn't, and I was really happy with that. I could have cut out even more time by using a single serve cereal boxes or other smaller movie-sized candy boxes, but as I said, I wanted uniformity of sorts. But I'm not sure if I'm going to stick with making the boxes in classrooms because I only have 1 or 1 1/2 hours per project.


Thanks and have fun!


Tuesday, July 7, 2015

Terrific Toys - Minotaurus by LEGO

My son had this game for several years, but we never really played with it until recently. And boy was I surprised at how wonderful Minotaurus is!


The goal of this game is to get two out of three people to the matching colored area of the secret/sacred temple to win the game.


Each player rolls the dice and either he/she can move people matching the number rolled on the dice or move pieces according to the color square rolled.

  • Black - Move the Minotaur eight spaces. If Minotaur captures people, people must return to the start position.
  • Gray - Move one gray blocking wall from the edge of the game board to any place in the labyrinth.
  • Green (this is optional) - Allows the people to jump over hedges (green LEGO pieces) and move three spaces.


The best part of the game is...it encourages people to change the rules. YOUR GAME - YOUR RULES. That's what it says in the rules book, and we've been changing the rules since we rediscovered this game. Sometimes, it's almost as if there are no rules!


Let your creativity kick into gear and drive other players crazy by coming up with all kinds of rules.

We had a lot of fun moving the gray walls around all over the labyrinth. Blocking the starting point. Blocking the temple entrance. Etc.

Enjoy!

Monday, July 6, 2015

Air-powered vehicle, Part 1 - How to make a box (vehicle body)

This is what we are making.


But first, we must learn to make a box, first. OK. It seems a little odd that I should start off this project by teaching you have to make a box, but it will all make sense soon.


I saw a variation of this project in a science project kit/book combo. However, I can't afford to spend almost $17/student (since I collect $10/year/student), so I had to figure out a way to make it affordable.


The box will become the body of the vehicle. I can easily ask the students to bring a box for this project, but I want uniformity. So, we'll make a box.


Supplies Needed:


  • Two pieces of construction paper

Project Instructions:


  • Step 1 - Fold one corner of the construction paper.


  • Step 2 - Cut out the excess and make a square.
  • Step 3 - Put the corners together and fold it in half to make a triangle. Fold the top of the triangle (pointy-end) toward the bottom of the triangle in half.
  • Step 4 - Fold it in half again.
  • Step 5 - This is what you get. Then repeat the folding process in the opposite direction.
  • Step 6 - Again, fold it in half, and then half, again to get this.
  • Step 7 - A square with folding grids.


  • Step 8 - Fold the opposite ends together to make a triangle. Then from the top of the triangle, make a cut two squares in from the pointy-end. Leave one square from the bottom of the triangle uncut.
  • Step 9 - Leave the pointy-end pieces alone, for now. 
    Then fold in the side pieces toward the center of the box. The box should be two squares wide and one square deep.


  • Then fold the pointy-end pieces over the folded pieces and tuck it under.


  • Step 10 - Complete! The lid of the box is done. 
  • Step 11 - Now for the box bottom, this piece needs to be a little smaller. Make the first square a little smaller and cut off the excess from one side.
  • Step 12 - Repeat Step 3 to Step 10 for the bottom of the box.


We'll need to make two boxes for this project. To inspire you, I've attached another photo of the finished project.


Make one (or two boxes) and have fun!


Tuesday, June 30, 2015

Bias of our Choices

I haven't done much this year, but I used to include more "non-engineering" projects in my science project classes. And this project is one of them. It's all about our how our preferences and bias of our choices. 

The worksheet I created for this project has two parts. The first part is about making connections with our preferences and our biases. The second part is about using the knowledge about the colors to make marketing choices.

Before we start the project, we talk about our favorite colors and what they mean. 
  • People who like RED need physical fulfillment. 
  • People who like BLUE need inner peace and truth.
  • People who like YELLOW need logical order in their lives.
  • People who like GREEN need to belong, to love, and to be loved.
  • People who like BLACK need power and control in their lives.
Then we discuss whether we believe our decisions are influenced by the colors we like. Or if our favorite colors change depending on where we are or what we're doing. 

Supplies Needed:
  • Bags of M & M's, Skittles, jelly beans, etc. to get many different colors of candy.
  • A plastic container in which the pieces of candy could lie flat in one layer.
  • Paper
  • Pencil
  • Crayons
  • Markers
First Project Instructions:
  1. Count out an equal number of candy in different colors and put them in the plastic container.     


  2. Put one arm behind your back. 


  3. Pick 20 candy pieces as quickly as possible using only the thumb and the index finger. 


    My daughter tried to hurry and picked multiple pieces at one time and put them down. We had to repeat the process several times. I see this in classrooms all the time.


  4. After picking the jelly beans, write down how many of each color you’ve picked on a piece of paper. 


Looking at the colors of candy you picked, can someone else correctly guess your favorite colors (or at least general shade of it)? 

My daughter's favorite color is turquoise, but since she couldn't pick turquoise, she picked a lot of greens (two different shades) and blue.

Second Project Instructions:

For the second part of the project, each group or table team is a marketing/packaging consulting firm. Each team must come up with three packaging schemes for three of their clients. 
  • Client 1 wants a sports packaging that says - I'm #1, and I can take anybody (Nike).
  • Client 2 wants a food packaging that says - I'm good for you, but I'm a good value for your money, too (Cheerios).
  • Client 3 wants a luxury item packaging that says - I'm worth the money, so spend it (Apple, Tiffany, etc.).
  1. Take a piece of paper and brainstorm.
  2. Begin drawing designs and come up with color schemes.
  3. Give a 5-minute talk about your team strategy and color schemes.
I tried this project with 2nd graders, but I think this project works best with 4th grade and up, especially for the second part of the project.

Have fun!

Monday, June 29, 2015

Woo Hoo! Instructables Rock!

1000+ views of my robotic hand making instructables post today.

Robotic Hand Instructables

Exciting News

I posted my first instructables on Instructables.com, and it got frontpaged!

My first instructable was on making a robotic hand, which I posted on my blog several days ago. My son recently told me about Instructables, and I thought it was a very interesting site. So, I decided to post it today.

Robotic Hand Instructable

I'm very glad I did it, and if you're blogging about how to do something, I'd recommend posting your instructions on instructables. 

If you check out my blogs already, go check out Instructables.com.

Have fun.

Thursday, June 25, 2015

Robotic Hand, 1st Attempt - June 22, 2015

Projects described in books or shown on Youtube seem absurdly easy, but I have yet come across a project that didn't need any tinkering before I could take it into a classroom. This one isn't too bad, but it still took me longer than I expected.

I came across this robotic hand project on Youtube as well as teachengineering.org (I think), but when I tried to build it, it took me almost two hours to work out the kinks. 

Sure, I did have to try several different versions and had to make adjustments as I went along, but I'm not sure if this is something I can take directly into a classroom of 2nd graders without more tinkering.

BUT... I think it'll be fun to try it with my kids.

Supplies Needed:
  • Cardboard paper or cardstock paper
  • Standard drinking straws (Dollar Store variety is fine)
  • Pearl drink straws or bigger diameter straws
  • Tape
  • Yarn or twine
Project Instructions (as of now):

  • Trace your hand on a cardboard or cardstock paper.
  • Cut the traced hand out (cutting it a little bigger than the actual tracing).


  • Mark your finger joints on the cutout.
  • Draw straight or curved line across it.


  • Fold the fingers at the lines.
  • Cut smaller straws to size (leave a little gap between the lines to facilitate in threading the yarn).
  • Tape straw pieces to the hand.
  • Thread yarn through the straw pieces. Each finger will have a length of yarn of its own.
  • Thread all five pieces of yarn through the bigger straw.

The writing on the hand has nothing to do with this project. I was recycling a stack of cardstock paper, and this one came out the best.
The threading part was difficult. If I had a big needle for the yarn, it would have made it easier, but I didn't. So, I struggled with it. If I do go forward with this one, I think I'll have to buy big plastic needles for this project.

The backside of the robotic hand.
I had grand plans for making a sleeve that will cover the arm, but I'm not sure I'll be able to build all of that in an hour let alone a 2nd grader. So, I might still try it, but I probably won't take it into the classroom.


If I were doing this in a classroom, I think I'll buy different colored yarns for each finger, so the students will know which finger they are trying to move. With the same colored yarns, it was difficult to figure out which end went with which finger.


I'll try to get my kids to make it soon, and post the results. In the meantime, why don't you give it a try? I spent two hours doing it, but it didn't feel like two hours. So, at the end of the day, if you enjoyed it, does it matter how long it takes? Unless, of course, you only have an hour of school science project time.

Have a great day and have fun!

P.S. - If you have any ideas about making this project more 2nd grader friendly, please let me know. Thanks!