I know. It's a mouthful, isn't it? But this is a great project.
I've been doing it for a long time, and every time, the students love it, whether they are in 2nd grade or 6th grade.
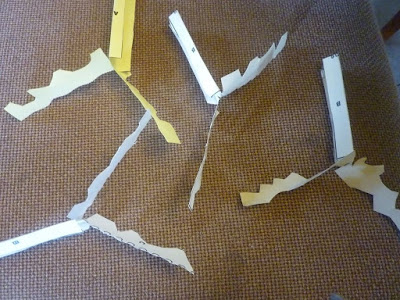
This is what we're making today.
An important disclaimer first. I got this project idea from science buddies.
Before I start the project, I discussed the concept of biomimicry. Simply, it means that engineers are trying to use what we find in nature to improve functions of man-made objects. A splendid example is velcro. It was invented by a man who went for a walk with his dog and came home with a lot of hooked burs from the local hills on his socks and his dog. He studied the burs and invented velcro. Imagine that!
Cat's Paws and Catapults by Steven Vogel has a book full of Biomimetics examples. You might want to check it out.
So, what is biomimetics?
Studying and Learning from Nature
One of the best examples of Biomimetics is velcro. A Swiss engineer took his dog for a walk and found these things clinging to his dog's belly and legs. It took a long time for him to take these things off, and one day, he looked closely at the things he was taking off his dog. He found these tiny hooks at the end of the things that were clinging to the stomach and eventually invented velcro. Can you believe it?
Sciencebuddies.org used to have a wonderful lesson associated with this, but it's no longer available (at least I couldn't find it). So, I'll have to do my best to give you a short summary.
The bumps on humpback whales' fins called tubercles (scalloped pattern)
help the whales swim through the water easily.
The spikes on sharks' skin called denticles (saw-tooth pattern)
help the sharks slice through the water effortlessly.
Scientists and engineers are working to incorporate these design elements to planes and ships, among other things. They believe that if we could put a thin skin of these patterns on our planes, it might cut our travel time over 50%!
Imagine that!
For this project, you need to cut out the three separate patterns, test them and figure out which pattern helps the whirly-bird slice through the air best.
When I do this project in class, I'm the client and the students are aerospace engineers who are competing in teams to win a chance to build a revolutionary new aircraft. They must test the three patterns and make recommendations according to their flight data (how long the various whirly-birds took to reach the ground).
List of Supplies:
- Paper, to copy the whirly bird designs on them.
I've used different kinds of paper in class (plain copy paper, construction paper and cardstock paper), and it really doesn't matter what kind of paper, as long as they are different. I want the students to notice the difference in flight.
- Scissors
- Craft scissors for make patterns.
It would be nice to have scalloped and saw-tooth patterns, but this is not a must have. Any sharp vs. curvy pattern would do.
- Pencil and notebook paper to take down data.
I have the students count in their own consistent way to keep track of how long it takes for the whirly-birds to reach ground.
Build instructions:
- Cut along the outside solid lines.
- Cut the side lines (about midway down) and the blade lines.
If you have craft scissors, use them to make the cuts. If you don't have the craft scissors, make the cuts like the patterns, but you don’t have to follow the pattern exactly. As long as you get a saw-tooth pattern (sharp and pointy) and a scallop pattern (rounded and wavy), they should work.
- Fold length-wise, along the bottom half of the whirly-birds
- Fold the sides in.
- Fold the blades out in opposite direction.
- Hold it out in arm's length and release gently.
Don't try to throw it. The best results come from gently letting it go in the air.
And how fast it reaches the ground is important, but what's more important is how smoothly the blades slice through the air as it descends to the ground.
Basic Design
After students have tested the three basic designs, I ask them to make designs of their own. There are no restrictions here except that the students CANNOT leave their whirly-birds in their original design.
I was hoping to attach a link to this pattern from sciencebudies.org, but this pattern is no longer available, but the patterns look like this.
Again, rounded, scalloped pattern represents the whale tubercles, and the saw-tooth pattern represents the shark denticles. The straight line represents the standard blade-edge design for helicopters, wind turbines, etc.
When I do this project in a classroom, kids line up 3 to 4 in the front of the classroom. Then they release their best whirly-birds at the same time, and the teacher and I judge according to the smoothness of the flight and how fast it descends to the ground.
Please note that the fastest whirly-bird isn't always the winner. We look at the smoothness and the beauty of the flight more.
Other things to look for in judging Whirly-Bird Olympics:
- Flight patterns
- Swirls
- Turn speed
- Creative Blade design
Have fun!


