Wednesday, January 31, 2018

Roaring Roller Coasters

This is a project I do almost every year because the students have so much fun. 

The premise of the project is that there is a competition, sponsored by the premiere roller coaster company E2, Extreme Experience, to see which team can build the greatest roller coaster for E2’s next project. 

The rules of the project are: 
  1. The roller coaster must have at least one loop.
  1. The ride should be thrilling (extra points for speed).
The tree different marbles represent three different types of roller coaster cars – empty (wooden), half-full (glass marble) and full (metal ball bearing).

The roller coaster design must support all three types of cars. After a run, all three types of marbles must fall/fly into a target cup. Rolling into a cup on the ground does not count.

List of Supplies:
¾” diameter piping insulation (can be purchased from any hardware store)
½” diameter ball bearing, metal
½” wooden marble
½” glass marble
Plastic cups
Adhesive tape
Anything else you have on-hand to build a support structure


First build. This was extremely accurate roller coaster.


Second build for the team that executed the roller coaster above. A team must have two loops after they complete their initial run, and this was an ambition design.


This team used the existing space very, very well.


This team put in two loops to start.


A very interesting use of a classroom furniture.


Another example of students being very creative.


An innovative support structure.


Monday, January 29, 2018

LEGO Technic Build (Mechanisms) - Page 142, Build #182

I am a lover of LEGO, and I bought a book, The LEGO Power Functions Idea Book by Yoshihito Isogawa last fall.

Initially, I thought I'd use the book to build with my daughter and nephews. However, I soon realized that even though my daughter and nephews are advanced LEGO builders for their age, they were still having some problems building the more sophisticated machines and mechanism because there were only a few photos accompanying each build.

So, I decided to put together these step-by-step building process for my nephews who live farther away than I like. So, this was the genesis for Building my way through a LEGO Power Functions Book section in my blog.

I'm going to build the machines and mechanisms that are visually interesting, and I'm going to skip around the book. So, I will note the page # as well as the build # in the book on each blog.

Today, I'm going to build a cam mechanism.

So, what is a cam?

A cam is a rotating machine, which transfers a oscillating or reciprocating motion to another part known as a follower. A really good example of a cam is a car engine.


I'm building this today.


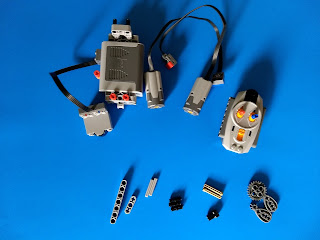
Pieces I'm going to use today.


I bought two tubs of technic parts, and I didn't have a particular piece used in the book. So, I chose a piece that came close to it and used it.


A follower is already done.


A follower taken apart.


Building the cam.


Attachments to attach the gears.


Gears attached with the follower on top. Cam pieces off to the side.


Cam pieces attached.


My power functions set came from a $99 LEGO Technic set, but you can purchase a similar power functions set for ~$30.


A short video of the cam working. Enjoy!


Take the 2018 Fluor Engineering Challenge!

I became aware of this competition a little over a year ago (2017 challenge, which was different from this one) when I was perusing the sciencebuddies.com site. I thought it was interesting and tried it with my daughter's class along with a few other classes.

Though the teachers and I were concerned about spilling water in class on the carpet (yes, last year's project involved a tub of water), it wasn’t too bad. And the project was great! The students learned a lot, but more importantly, they had fun figuring things out for themselves.

Year after year, this Flour Engineering Challenge is just plain fun. But best of all, it gives your children opportunities to win money for their school.

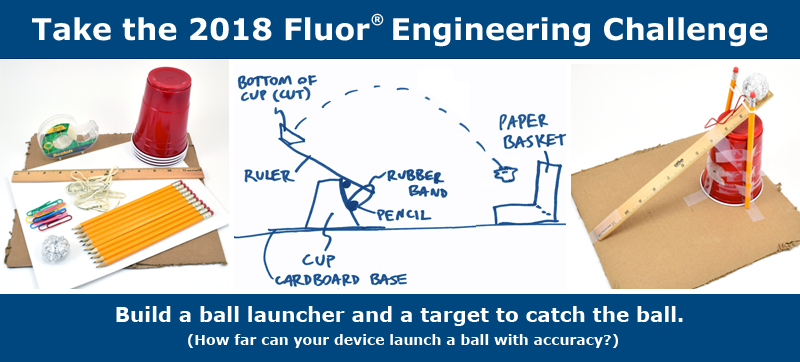
2018 Fluor Engineering Challenge


The objective of the 2018 Fluor Engineering Challenge is to use limited materials to build one device (the launcher) that launches an aluminum foil ball and another device (the receiver) that catches the ball. The farther your ball flies before being successfully caught by the receiver, the more points you get. 

Your children can use only a limited list of materials, and there are points associated with each item. The less material your children use, the more points they keep.

List of Materials (see website for more detail description):
Corrugated cardboard base
Large paper or plastic cups
Wooden rulers
Paper
Wooden pencils
Rubber bands
Large paper clips
Roll of adhesive tape

2018 Flour Engineering Challenge Website

Challenge objective & info

In mid-February, I’m planning to do this project at a local elementary school. I’ll share the results with you afterwards.


Have fun!