Showing posts with label tape. Show all posts

Monday, March 12, 2018

2018 Fluor Engineering Challenge Day!

On 3/9, ~130 6th graders from a local elementary school participated in the 2018 Fluor Engineering Challenge. I was floored by the students' creativity, and how well their launchers performed.

This is what we did on Friday.


Enter the 2018 Fluor Engineering Challenge for K-12 Students (from the website)

Who can enter? The 2018 Fluor Engineering Challenge is open to K-12 students around the world. Students can enter individually or as teams of up to four students. Only one entry per team is allowed. 

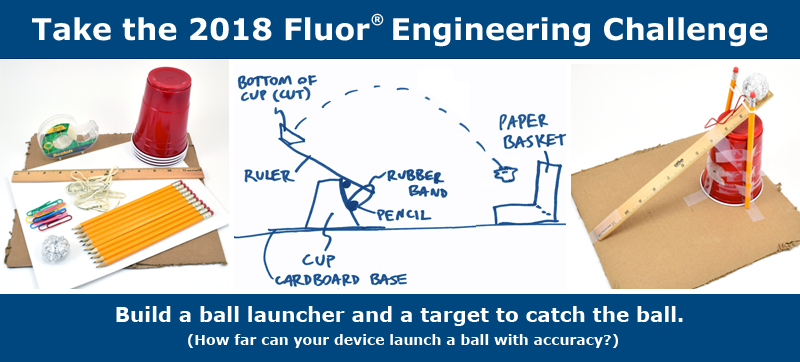
What do I do? Build a device to launch a ball as far as possible, and another device to catch it, all from a limited list of materials like pencils, rubber bands, paper, and tape. The farther you can launch the ball (following the challenge rules) before it touches the ground, and the fewer materials you use, the higher your score. 

Where is the challenge happening? Students can do this challenge anywhere! The 2018 Fluor Engineering Challenge is designed as a fun hands-on engineering project to do at home, in the classroom, or as part of an afterschool program.

When is the challenge taking place? Students may build and test their ball launchers anytime now through March 16, 2018. Entries may be submitted February 18, 2018 through March 16, 2018. All entries are due by midnight Pacific Time (GMT-8) on March 16, 2018.

Why should I enter? Building devices to send aluminum foil balls flying across the room is fun! Plus, there are bragging rights up for grabs. We will be posting top scores on our 2018 Fluor Engineering Challenge score board. Students from anywhere in the world, regardless of location, are eligible to participate in the competition to get their team name on the score board by completing the challenge and submitting their scores. 

Additionally, Fluor will reward ten teams, drawn at random from the geographic locations listed below, with a $1,000 USD check for their school or afterschool program! 

List of Supplies (from Science Buddies Website):

Construction Materials
ItemMaximum
Quantity
Point cost (each)
Corrugated cardboard base (max size 12"x12" or 30x30 cm)10
Large paper or plastic cups (16–18 oz, or about 450–500 mL)450
Wooden ruler or paint stirrer (12"/30 cm)2100
Paper (printer/copier paper, not construction paper or cardstock; letter or A4 size)1010
Wooden pencils (circular or hexagonal cross-section, approx. 7–8" or 18–20 cm length)1010
Rubber bands (size 32, 3" long unstretched and 1/8" wide)1020
Large paper clips (approx. 2" or 50 mm length)105
Roll of clear adhesive tape (Scotch® tape or equivalent, 1/2" or 3/4" width, max length 500")1100


Here are some pictures from our 6th graders. Enjoy!


There were even more variations, but my phone battery ran out.  Too bad.

Isn't it amazing? The students were so creative! I did this project with the 6th graders because of the Fluor Engineering Challenge, but this is a great project on its own. The kids had a great time and learned even more in the process. I hope you try it with your children/students.

Have a wonderful day.

For your convenience, here is the previous blog post on the Fluor Engineering Challenge.


The best part? You still have time to enter? So, why don't you give it a try?


Monday, January 29, 2018

Take the 2018 Fluor Engineering Challenge!

I became aware of this competition a little over a year ago (2017 challenge, which was different from this one) when I was perusing the sciencebuddies.com site. I thought it was interesting and tried it with my daughter's class along with a few other classes.

Though the teachers and I were concerned about spilling water in class on the carpet (yes, last year's project involved a tub of water), it wasn’t too bad. And the project was great! The students learned a lot, but more importantly, they had fun figuring things out for themselves.

Year after year, this Flour Engineering Challenge is just plain fun. But best of all, it gives your children opportunities to win money for their school.

2018 Fluor Engineering Challenge


The objective of the 2018 Fluor Engineering Challenge is to use limited materials to build one device (the launcher) that launches an aluminum foil ball and another device (the receiver) that catches the ball. The farther your ball flies before being successfully caught by the receiver, the more points you get. 

Your children can use only a limited list of materials, and there are points associated with each item. The less material your children use, the more points they keep.

List of Materials (see website for more detail description):
Corrugated cardboard base
Large paper or plastic cups
Wooden rulers
Paper
Wooden pencils
Rubber bands
Large paper clips
Roll of adhesive tape

2018 Flour Engineering Challenge Website

Challenge objective & info

In mid-February, I’m planning to do this project at a local elementary school. I’ll share the results with you afterwards.


Have fun!

Monday, June 12, 2017

Balloon Rocket Cars

I am always looking for an easy project I can do in a classroom of 30+ kids. If I can quickly put kits together, that's great, but many projects, especially when preparing for 30+ kits, take a lot of work and time. So, when I found a kit for this project for $1.20/kit, I jumped on it and bought 4 sets of 10 kits. But I realized that I could probably put a kit together cheaply with every day materials.
Putting the vehicle together took matter of minutes, which was great since I only had an hour for the project. Then they were asked to power it by attaching a balloon to it. They were given a choice of two different sized balloons as well as complete freedom to shape and attach the straws whichever way the students wanted to try. I like to tweak things a bit, forcing the students to figure things out on their own.
The students had a fantastic time trying out different weights, sizes, attachments and learned while having fun. Unfortunately, we didn't have enough time to try out the incline surfaces and frictional losses. But, I'm looking to continuing with it during next school year.
I hope you’ll have fun with this project!

SUPPLIES:

For Vehicle:
  • 1 Corrugated plastic or cardboard piece for the vehicle body (3 in x 5 in)
  • 2 Plastic coffee stirrers
  • 1 Plastic drinking straw, cut in two equal pieces
  • 4 Foam disks for the wheels (~ 2.5 in in diameter and 0.5 in thick), but if you can't find these, you can cut them out from the same corrugated cardboard
  • Tape
For Rocket Balloon Power:
  • 1 Plastic drinking straw
  • 1 Balloon any size, but I took balloons of various sizes to the classroom to show the students the difference in air-power (also, to show them that BIGGER isn't always BETTER)

INSTRUCTIONS:


  • I used a delivery cardboard box to cut out my vehicle chassis (3 inches x 5 inches).
I was able to cut out several fairly easily and quickly. But I'm not sure I'd be up for cutting out 30+ sets x up to 12 classrooms. So, I would probably buy the kits, if I could still find them for $1.20/kit.
  • Cut a drinking straw in half.
If you have a bendy straw, cut off the bendy part first. Then cut the rest of the straw into two equal pieces.
  • Tape the cut pieces of straw on to the both narrow sides of the vehicle chassis, centering it across the width.

  • Insert one end of the coffee stirrer into one of the foam disks.


  • Insert the coffee stirrer with a wheel attached already through the already taped drinking straw on the vehicle chassis.
  • Insert another wheel on the remaining end of the coffee stirrer.

  • Do the same for the other side.

  • Cut a drinking straw to your desired length.
If you have a bendy straw, you can decide what to do with the bendy part. Then cut the straw to the length you want. It's up to you to decide which length works for your design.
  • Insert a straw into a balloon.
  • Put a rubber band around the neck of the balloon over the straw.
DO NOT tie the rubber band too tight. It can collapse the straw, and it won't work well (I've learned from experience).


I decided to create two different designs to see if there's a difference in the distance the vehicle traveled.
  • The 1st balloon rocket design has a straight straw piece inserted in the balloon.
  • The 2nd balloon rocket design has a bendy straw piece inserted in the balloon.
The 1st balloon rocket design traveled farther with the vehicle than the 2nd.
NOTE: I tried 2nd balloon rocket design with the bendy part up and down, and both positions had problems. Why don't you try it and see what it does?
PROBLEM SOLVING:
  • As soon as the students started testing their balloon rocket cars, they complained about the wheels coming off completely or their cars curving to the right or the left. I challenged them to come up with a solution to their problem.
Many started with taping the ends of their axel to stop the wheels from coming off, but it didn't stop the wheels from wobbling and not going straight (which was one of the requirements of the project).
  • Some complained that their vehicles refused to move, even with a gigantic balloon attached to it.
They had taped the axel (the coffee stirrer) to the axel housing (cut drinking straw), and it couldn't rotate. Therefore, the wheels couldn't rotate, which prevented the vehicles from moving.
  • Some students did blow gigantic balloons and learned that BIGGER isn't always BETTER.
Though the vehicles started fast, but they turned upside-down or rolled to one side due to the balloon rocket being too powerful for the vehicle. We tried to weigh down the vehicle, but it didn't work very well.
ADDITIONAL PROJECT IDEA 1:
This is part 1 of the add-on project I didn't get to do with the class.
  • Measure how far a vehicle will travel on flat surface.

  • Ramp 1 - Measure how far the same vehicle will travel on this inclined surface.
The plastic tub is 6 inches high, and the ramp is 22 inches long.
  • Ramp 2 - Measure how far the same vehicle will travel on this inclined surface.
The plastic tub stack (2 tubs) are 12 inches high, and the ramp is 22 inches long. The steeper descent made the vehicle more unstable, and it crashed into the nearby wall.
ADDITIONAL PROJECT IDEA 2:
This is part 2 of the add-on project I didn't get to do with the class.
  • Measure how far a vehicle with travel on flat surface (see project idea 1).

  • Measure how far the same vehicle will travel on carpet.
NOTE: The car on the carpet will not travel as far as the car on the smooth surface. The difference in the distance traveled is the force lost due to friction.
SCIENCE BEHIND THIS PROJECT:
I love Newton's Second Law, because it's easy for people to understand.
Force = Mass x Acceleration.
I use this all the time when I do projects with students. Whether it's a kindergarten class or a sixth-grade class, I write F = ma on the whiteboard and explain the relationship between them.
On flat surface (1st diagram): F = ma = F (Balloon) - F (Ground friction)

  • The total of all the forces acting on our vehicle will result in acceleration.
  • How fast the vehicle will accelerate will depend on the size of the force acting on the vehicle.
  • When the air in the balloon is pushed out of the straw through the back, the balloon is pushed forward. When the balloon is pushed forward and is taped to the vehicle, the vehicle moves forward with the balloon.
Actually, F=ma is too simple. What it really means is that F = ma = F (Balloon) - F (Ground friction). But in most cases, we assume F (Ground friction/Resistance) = 0 on smooth surfaces because it's very, very small.
On a ramp (2nd diagram): F = ma = [F(Normal) - F(GravityY)] + [F(Balloon) + F(GravityX) - F(Ground friction)]

  • The total of all the forces acting on our vehicle will result in acceleration.
  • How fast the vehicle will accelerate will depend on the size of the force acting on the vehicle.
  • When the air in the balloon is pushed out of the straw through the back, the balloon is pushed forward. When the balloon is pushed forward and is taped to the vehicle, the vehicle moves forward with the balloon.
If the ramp is smooth, F (Ground friction) = 0, too. F (Ground friction) depends the smoothness of the surfaces, not the angle of inclination. And conveniently, [F(Normal) - F(GravityY)] = 0, because they are equal and opposite forces.
So, the long equation is shortened to F = ma = [F(Balloon) + F(GravityX)].
NOTE 1:
In kindergarten, I use addition/subtraction to get them to understand the relationship between the three. If F is constant, and m is big, a is little and vice versa.
NOTE 2:
If you want to solve for F(GravityX), the mathematical equation is
F(GravityX) = F(Gravity) x sine(angle).
If you want to solve for F(GravityY), the mathematical equation is
F(GravityY) = F(Gravity) x cosine(angle).
NOTE 3:
In More Air-Powered 2, Frictional Forces, F(Ground Friction) is not 0.
The car on the carpet will not travel as far as the car on the smooth surface.
The difference in the distance traveled is the force lost due to friction.